东莞市网站建设_网站建设公司_轮播图_seo优化
B 树和红黑树的动画小吴还在制作当中,比想象中的复杂好多好多好多,今天先来一个图解版的 B 树。。。
1 引言
数据库的增删改查等操作是开发过程中最为常见也是尤为重要的,尤其是现在大数据的兴起,导致数据存储量急剧增加,提升数据的操作效率就变得尤为关键。
大部分数据库的索引都采用树的结构存储,这是因为树的查询效率相对较高,且保持有序。
对于二叉搜索树的时间复杂度是O(logN),在算法以及逻辑上来分析,二叉搜索树的查找速度以及数据比较次数都是较小的。
但是我们不得不考虑一个新的问题。
数据量是远大于内存大小的,那我们在查找数据时并不能将全部数据同时加载至内存。既然不能全部加载至内存中就只能逐步的去加载磁盘中某个页,简而言之就是逐一的去加载磁盘,加数据分块的加载至内存进行查找与比较。
例如:在图1.1所示的树中查找10,树中的每个节点代表一个磁盘页。每次访问一个新节点代表一次磁盘IO。
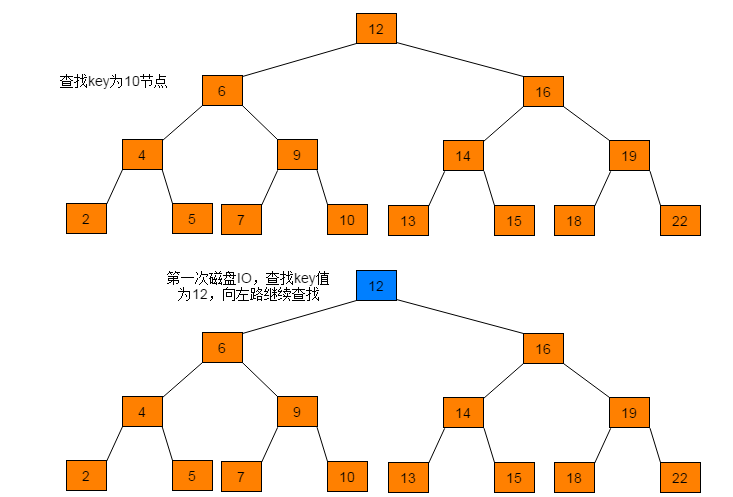
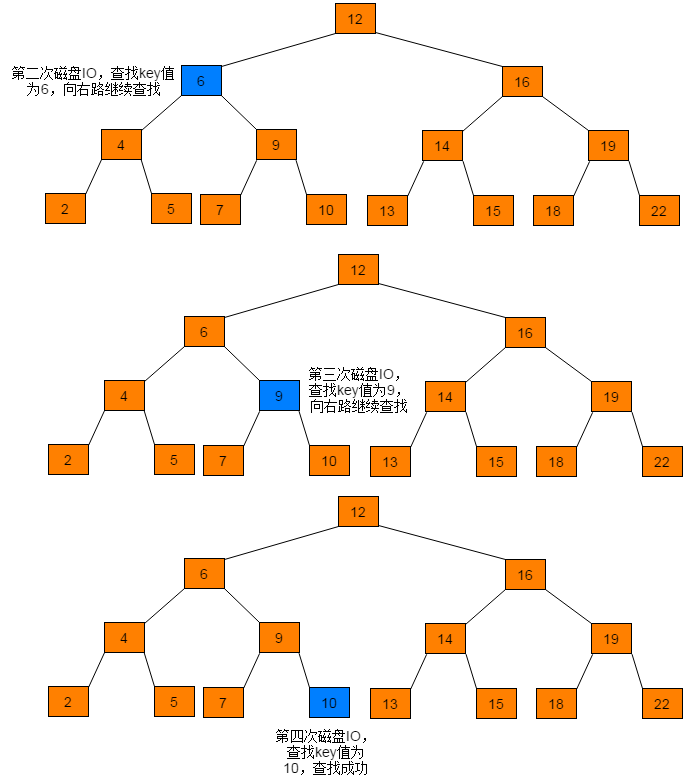
通过查找过程可以看出,磁盘IO次数与树的高度相关,在最坏情况下,磁盘IO次数等于树的高度。由于磁盘IO过程是相对耗时效率较低的,因此,在设计数据存储结构时需要降低树的高度,即将一棵“瘦高”的树变得“矮胖”。
当数据数目相同,在保持有序前提下,降低树高度,只需将节点中存储的key值增加,即二叉搜索树中每个节点只有一个key,现将一个节点中存储多个key,得到的树即为B树。
2 定义
B树也称B-树,B-树直接读作B树,不能因为有“-”号就读作B减树,它是一颗多路平衡查找树。我们描述一颗B树时需要指定它的阶数,阶数表示了一个结点最多有多少个孩子结点,一般用字母m表示阶数。当m取2时,就是我们常见的二叉搜索树,m为3时是2-3树。
一颗m阶的B树定义如下:
(1)每个结点最多有m-1个关键字。
(2)根结点最少可以只有1个关键字。
(3)非根结点至少有Math.ceil(m/2)-1个关键字。Math.ceil(m/2)含义是向上取整。例如Math.ceil(4.5) = 5。
(4)每个结点中的关键字都按照从小到大的顺序排列,每个关键字的左子树中的所有关键字都小于它,而右子树中的所有关键字都大于它。
(5)所有叶子结点都位于同一层,或者说根结点到每个叶子结点的长度都相同。
3 查找
B-树的查找其实是对二叉搜索树查找的扩展, 与二叉搜索树不同的地方是,B-树中每个节点有不止一棵子树。在B-树中查找某个结点时,需要先判断要查找的结点在哪棵子树上,然后在结点中逐个查找目标结点。B树的查找过程相对简单,与二叉搜索树类似,因此不再赘述。
4 插入
B树的插入操作是指在树种插入一条新记录,即(key, value)的键值对。如果B树中已存在需要插入的键值对,则用需要插入的value替换旧的value。若B树不存在这个key,则一定是在叶子结点中进行插入操作。
4.1 插入流程
B树的插入流程如下:
(1)根据要插入的key的值,对B树执行查找操作,查找到待插入数据的当前节点位置。
(2)判断当前结点key的个数是否小于等于m-1,若满足,则结束直接插入数据,否则,进行第(3)步。
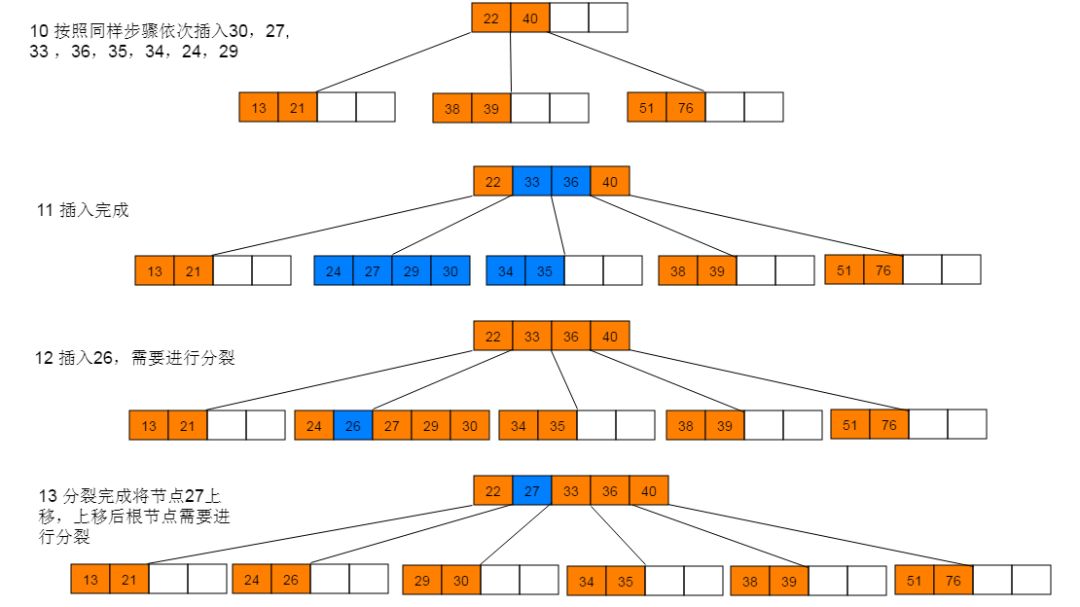
(3)以结点中间的key为中心分裂成左右两部分,然后将这个中间的key插入到父结点中,这个key的左子树指向分裂后的左半部分,这个key的右子支指向分裂后的右半部分,然后将当前结点指向父结点,继续进行第(3)步。
4.2 实例图解
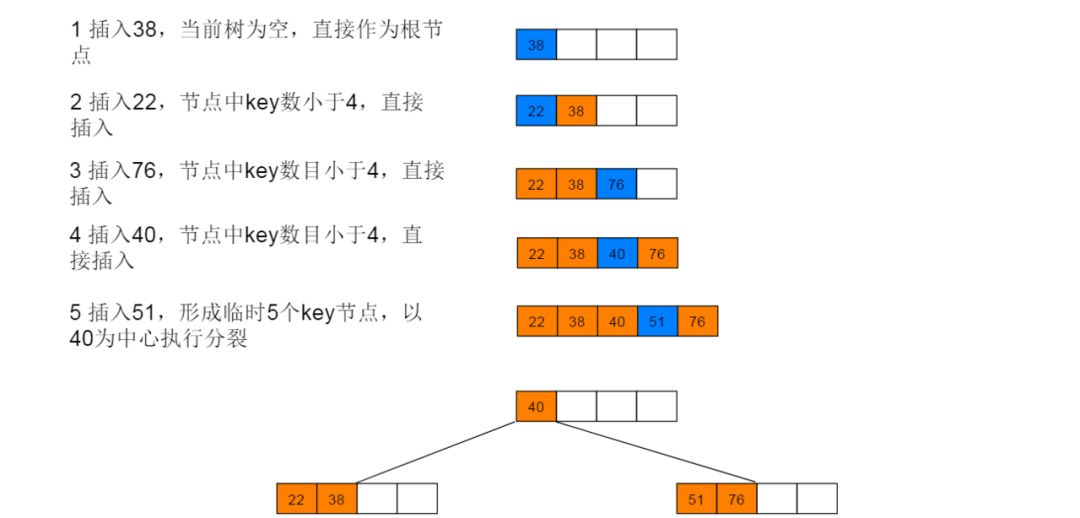
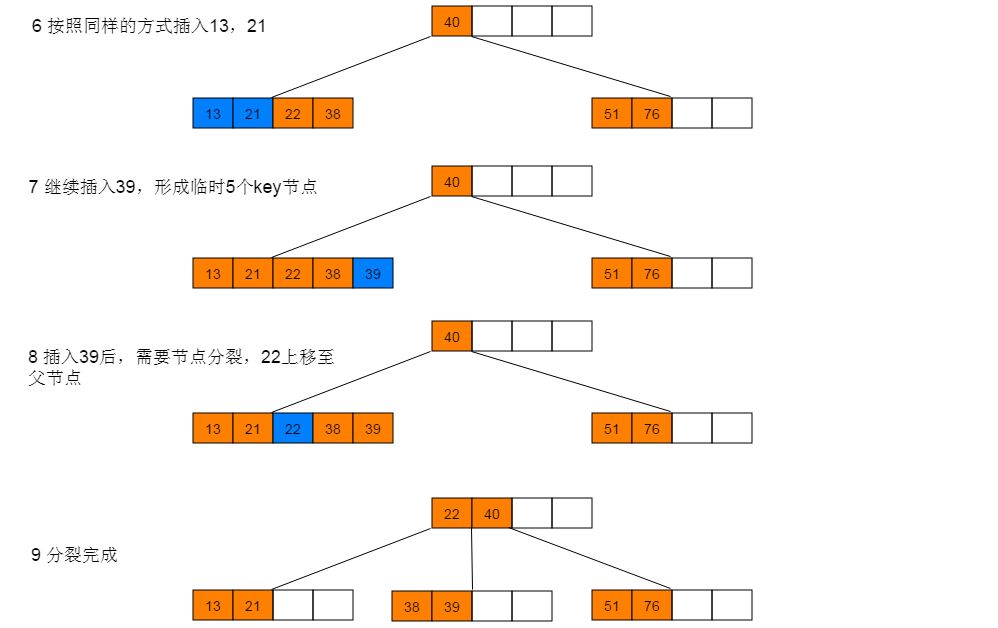
下面以5阶B树为例,介绍B树的插入操作,在5阶B树中,结点最多有4个key,最少有2个key。
插入图解:1:插入38,此时为空树,直接插入,并作为根节点。继续插入22、76、40,符合情形(2),直接插入。继续插入51,符合情形(3),执行分裂。
4.3 性能分析
B树插入过程首先需要执行一次查找操作,B树的查找操作的时间复杂度为O(mlogmn)。其中m为B树的阶数,n为B树中key的数目。在插入过程,最耗时的情形即为:插入数据后导致根节点发生分裂,分裂节点的操作是常数级,分裂操作向上回溯的时间复杂度为O(h)。因此,B树的插入操作的时间复杂度近似于查找操作,即O(mlogmn)。
5 删除
5.1 删除流程
B树的删除流程如下:
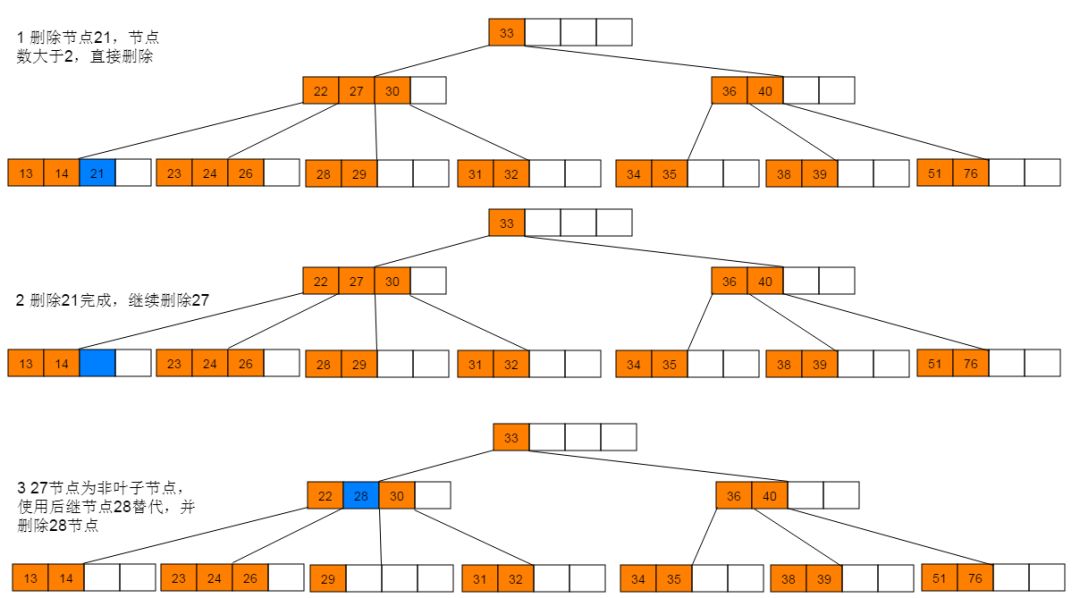
(1)如果当前需要删除的key位于非叶子结点上,则用后继key(这里的后继key均指后继记录的意思)覆盖要删除的key,然后在后继key所在的子支中删除该后继key。此时后继key一定位于叶子结点上,这个过程和二叉搜索树删除结点的方式类似。删除这个记录后执行第2步
(2)该结点key个数大于等于Math.ceil(m/2)-1,结束删除操作,否则执行第(3)步。
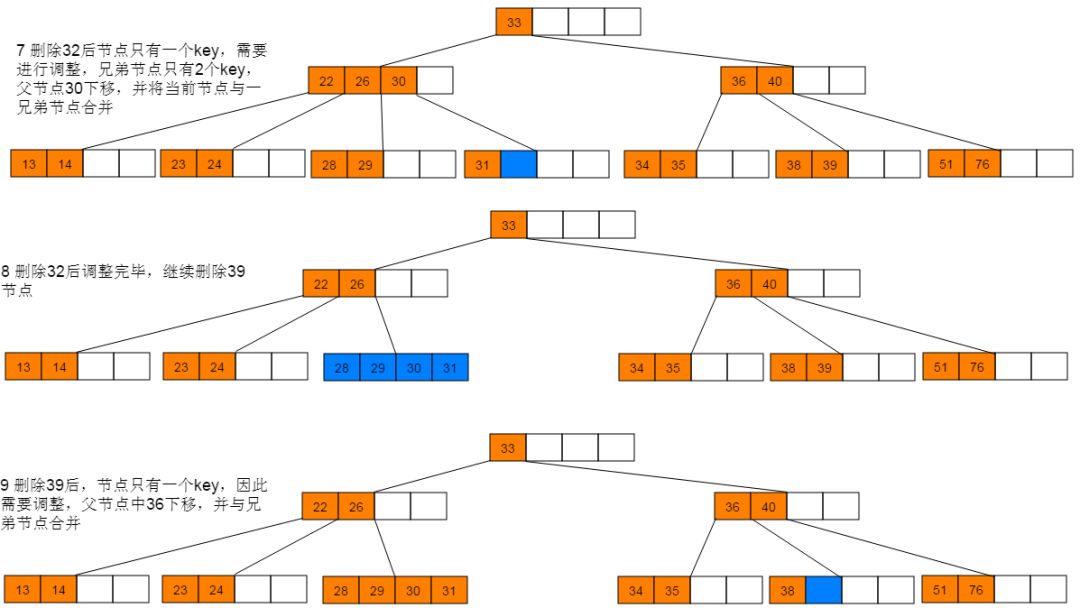
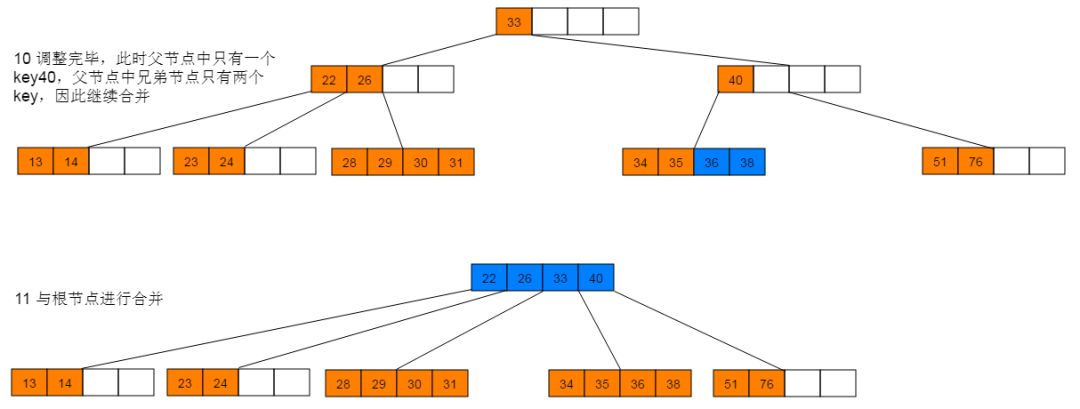
(3)如果兄弟结点key个数大于Math.ceil(m/2)-1,则父结点中的key下移到该结点,兄弟结点中的一个key上移,删除操作结束。否则,将父结点中的key下移与当前结点及它的兄弟结点中的key合并,形成一个新的结点。原父结点中的key的两个孩子指针就变成了一个孩子指针,指向这个新结点。然后当前结点的指针指向父结点,重复第(2)步。
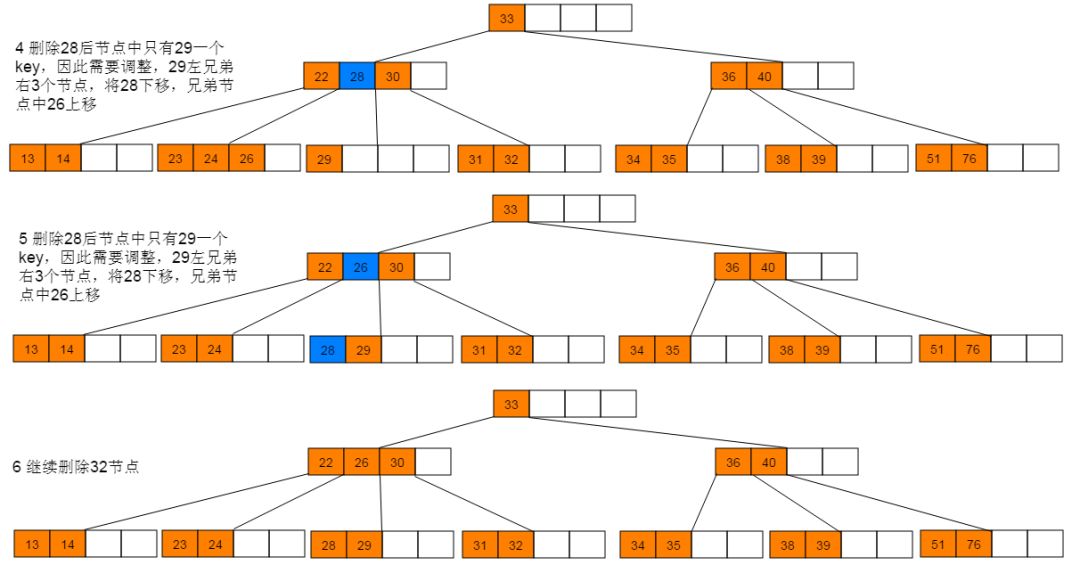
5.2 实例图解
删除图解:1:首先删除21,符合情形(2)直接删除。删除21后,继续删除27,符合情形(1),使用后继节点28替代27,并删除28。
5.3 性能分析
B树的删除操作同样需要执行查找过程,时间复杂度为O(mlogmn)。删除数据过程与插入过程类似,最坏情况需要回溯O(h)。因此B树的删除操作的时间复杂度近似为O(mlogmn)。
6 总结
B树是一种平衡的多路查找树。其设计思路主要是通过节点中存储不止一个key,来降低树的高度。同等比较次数下,树的高度小保证磁盘IO次数相对较少,提高查找效率。
END

推荐阅读:
盖尔-沙普利算法告诉你,你的对象在哪里?
面试官,我会写二分查找法!对,没有 bug 的那种!
如何有效的写算法题
几道 BAT 算法面试中经常问的「字符串」问题
链表算法面试问题?看我就够了!
欢迎长按下图关注公众号五分钟学算法,一起看动画学算法。