兴安盟网站建设_网站建设公司_在线商城_seo优化
目录
背景知识
互联网的发展
局域网和广域网
网络拓扑
网络协议栈
协议的概念
网络协议的分层
网络与操作系统的联系
网络传输的基本流程
IP地址和MAC地址
以太网通信
数据包的封装和分用
跨网段传输
背景知识
互联网的发展
计算机网络是计算机技术和通信技术相结合的产物,是信息化社会的主要技术设施。1946年,世界上第一台计算机ENIAC在美国诞生。随着微电子技术的不断发展,也使计算机网络经历了从简单到复杂、从低级到高级、从地区到全球的发展过程,计算机网络从为解决远程计算信息数据的搜集和处理而形成的联机系统开始,发展到以资源共享为目的而相互连接起来的计算机群,最终形成目前遍布全球各个角落的国际互联网,也就是因特网,一共经历了四个发展阶段:
- 面向终端的计算机网络。其系统基本由主机和系统构成,所有的数据处理和通信处理都由主机完成,从而导致了主机通信的开销较大,通信线路的利用率低下,对主机的系统依赖性较高。
- 多台计算机互连的计算机网络。这一阶段的标志性成果是提出了分组交换技术以及形成了TCP/IP协议的雏形。该阶段具有的特点是以分组交换网为中心、建立了计算机与计算机的互连与通信、实现了计算机资源的共享。但是也仍有不足的地方,比如没有形成统一的互连标准,使网络在规模与应用等方面受到了限制。
- 面向标准化的计算机网络。国际标准化组织ISO于1984年正式颁布了一个称为开放系统互连基本参考模型的国际标准,它是公认的计算机网络系统结构的基础,在这个阶段也形成了以TCP/IP为核心的因特网。
- 面向全球互连的计算机网络。这一阶段,在全球范围内极大地推动了计算机网络及其应用的发展,使计算机网络进入到一个新的发展阶段,各个国家建立了自己的信息高速公路,这些信息高速公路的互连就构成了全球互连的因特网。
简单来说就是,起初每个计算机相互独立,传输数据只能借助硬盘等外设。后来人们尝试着把几台电脑通过某种方式连接起来,逐渐发展为区域成熟的局域网(LAN)和广域网(WAN)。
互联网的发展带来的影响最明显的就是互联网公司的发展,但除了互联网公司之外,其背后的硬件设备也在发展,例如网线、光纤、路由器、交换机……
局域网和广域网
局域网,英文名字Local Area Network,缩写为LAN。是指在某一区域内由多台计算机互联成的计算机组。一般是方圆几千米以内。局域网是封闭型的,可以由办公室内的两台计算机组成,也可以由小范围内的上千台计算机组成。
广域网,英语名字为Wide Area Network,缩写为 WAN,又称广域网、外网、公网。指的是连接不同地区局域网或城域网计算机通信的远程网。通常跨接很大的物理范围,所覆盖的范围从几十公里到几千公里,它能连接多个地区、城市和国家,或横跨几个洲并能提供远距离通信,形成国际性的远程网络。一般所指的互联网是属于一种公共型的广域网。

局域网也叫内网,广域网也叫外网。外网ip可以被外界访问,内网ip不能直接被外界访问,也就是说要想上网就必须通过外网,内网是不能直接上网的,个人用户使用的都是内网ip。例如学校中个人电脑上网用的是学校申请的外网ip,家庭上网用的是运营商随机分配的外网ip。而一个外网ip下有多个内网ip,例如一个公司中用的是同一个外网ip。外网在世界范围内统一分配,外网ip是唯一的,内网在同一个外网ip下唯一,不同的外网ip下可以有相同的内网ip。
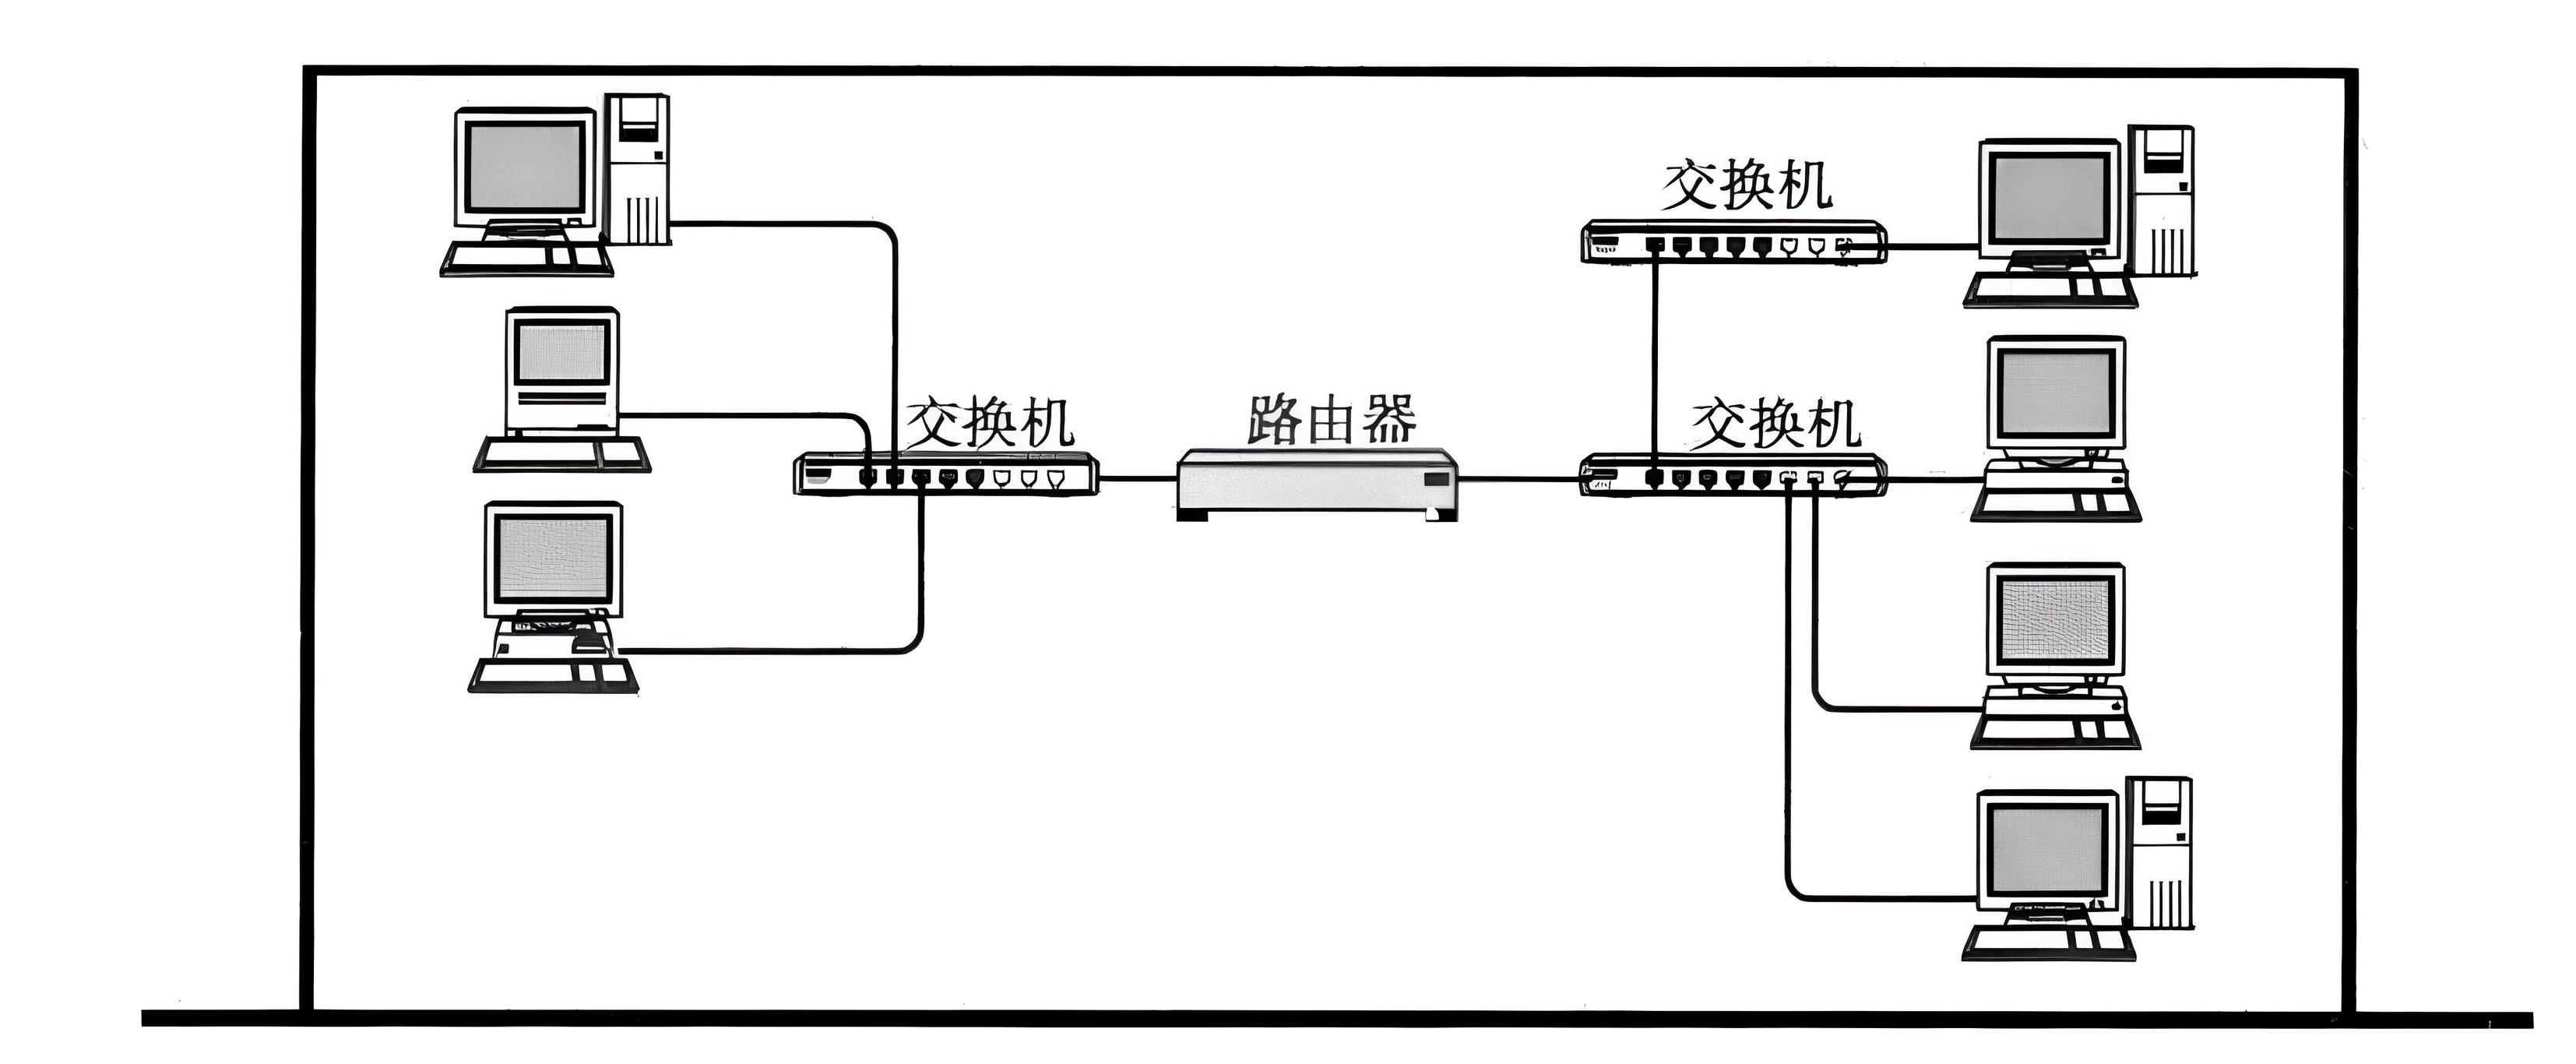
网络拓扑

网络拓扑(Network Topology)是指一个通信网络中各个设备(如计算机、服务器、路由器、交换机、打印机等)以及它们之间的连接方式在物理布局或逻辑结构上的排列和组织形式。它描述了网络元素(节点)以及它们之间的通信路径(链路或连线)的几何分布和相互关联。IP地址的分配就是基于网络拓朴的。
网络协议栈
协议的概念
计算机生产厂商有很多种,计算机操作系统也有很多种,计算机网络硬件设备也有很多种,所以就需要有一个东西让这些不同厂商之间生产的计算机能够相互顺畅的通信,这个东西就是网络协议。例如计算机之间的传输媒介是光信号和电信号,通过 "频率" 和 "强弱" 来表示 0 和 1 这样的信息,要想传递各种不同的信息,就需要约定好双方的数据格式。
所谓协议,就是一种约定,例如英语的语法就是协议的一种体现。而网络协议指的是计算机网络中通信实体之间交换信息时所必须遵守的规则。
网络协议的分层

网络使得我们可以低成本地实现远距离数据传输,相较于本地间进程间通信,网络通信的特点就在于物理距离变长了。但距离变长的同时,也带来了一些问题:
- 如何保证让数据能准确到达下一个设备。
- 如何进行路径选择,定位目标主机。
- 如何解决长距离传输种可能出现的数据丢失问题。
- 送达的数据如何使用的问题。
如上所述,网络传输过程中会存在各种各样的问题,而且在定义协议的时候问题也错综复杂,所以问题要一个个解决,于是我们把网络协议整体是分层的。所以我们把网络协议又叫做网络协议簇。层状协议的一个优点在于,各层之间的解耦合。当我们维护某一层时,就只需要对这一层做更新维护,无需对整个协议做更新。
对于网络协议,我们先来了解OSI网络协议,OSI网络协议共有七层:应用层表示层、会话层、传输层、网络层、数据链路层、物理层。具体介绍如下:
- OSI(Open System Interconnection,开放系统互连)七层网络模型称为开放式系统互联参考模型,是一个逻辑上的定义和规范。
- OSI协议把网络从逻辑上分为了7层,每一层都有相对应的设备,比如路由器、交换机、防火墙等。
- OSI七层模型是一种框架性的设计方法,其最主要的功能使就是帮助不同类型的主机实现数据传输。
- OSI协议的最大优点是将服务、接口和协议这三个概念明确地区分开来,概念清楚,理论也比较完整,通过七个层次化的结构模型使不同的系统不同的网络之间实现可靠的通讯。
但是由于OSI模型出现的比TCP/IP出现的时间晚,在OSI开始使用前,TCP/IP已经被广泛的应用了。如果要换成OSI模型也不太现实。其次是OSI只有协议的定义还没有具体的实践,该协议实现起来很复杂,很多公司不愿意用OSI。与之相比的TCP/IP协议更加简单,实现起来也相对容易,更符合市场的要求。总之由于各种原因,最终OSI模型没有被广泛的应用。所以现在广泛使用的就是TCP/IP协议。

TCP/IP 是一组协议的代名词,它还包括许多协议,组成了 TCP/IP 协议簇。TCP/IP 通讯协议采用了5层的层级结构,每一层都呼叫它的下一层所提供的网络来完成自己的需求。
- 物理层:物理层负责物理光电信号的传输。比如现在以太网通用的网线(双绞线)、早期以太网采用的的同轴电缆(现在主要用于有线电视)、光纤,现在的wifi无线网使用电磁波等都属于物理层的概念。物理层的能力决定了最大传输速率、传输距离、抗干扰性等。集线器(Hub)工作在物理层。
- 数据链路层:负责相邻设备之间数据帧传输,完成帧同步,差错控制,流量管理,链路管理等。例如网卡设备的驱动、帧同步(就是说从网线上检测到什么信号算作新帧的开始)、冲突检测(如果检测到冲突就自动重发)、数据差错校验等工作。有以太网、令牌环网、无线LAN等标准。交换机(Switch)工作在数据链路层。
- 网络层:负责地址管理与路由选择。例如在IP协议中,通过IP地址来标识一台主机,并通过路由表的方式规划出两台主机之间的数据传输的线路(路由)。路由器(Router)工作在网路层。
- 传输层:负责两台主机之间的数据传输。如传输控制协议 (TCP),能够确保数据可靠的从源主机发送到目标主机。
- 应用层:负责应用程序间沟通,如简单电子邮件传输(SMTP)、文件传输协议(FTP)、网络远程访问协议(Telnet)等,我们的网络编程主要就是针对应用层。
我们将上面的五层一般称为网络协议栈,由于网络层和传输层在整个网络协议栈中是最关键的,所以我们将这个网络协议栈称为 TCP/IP 协议栈。
网络与操作系统的联系
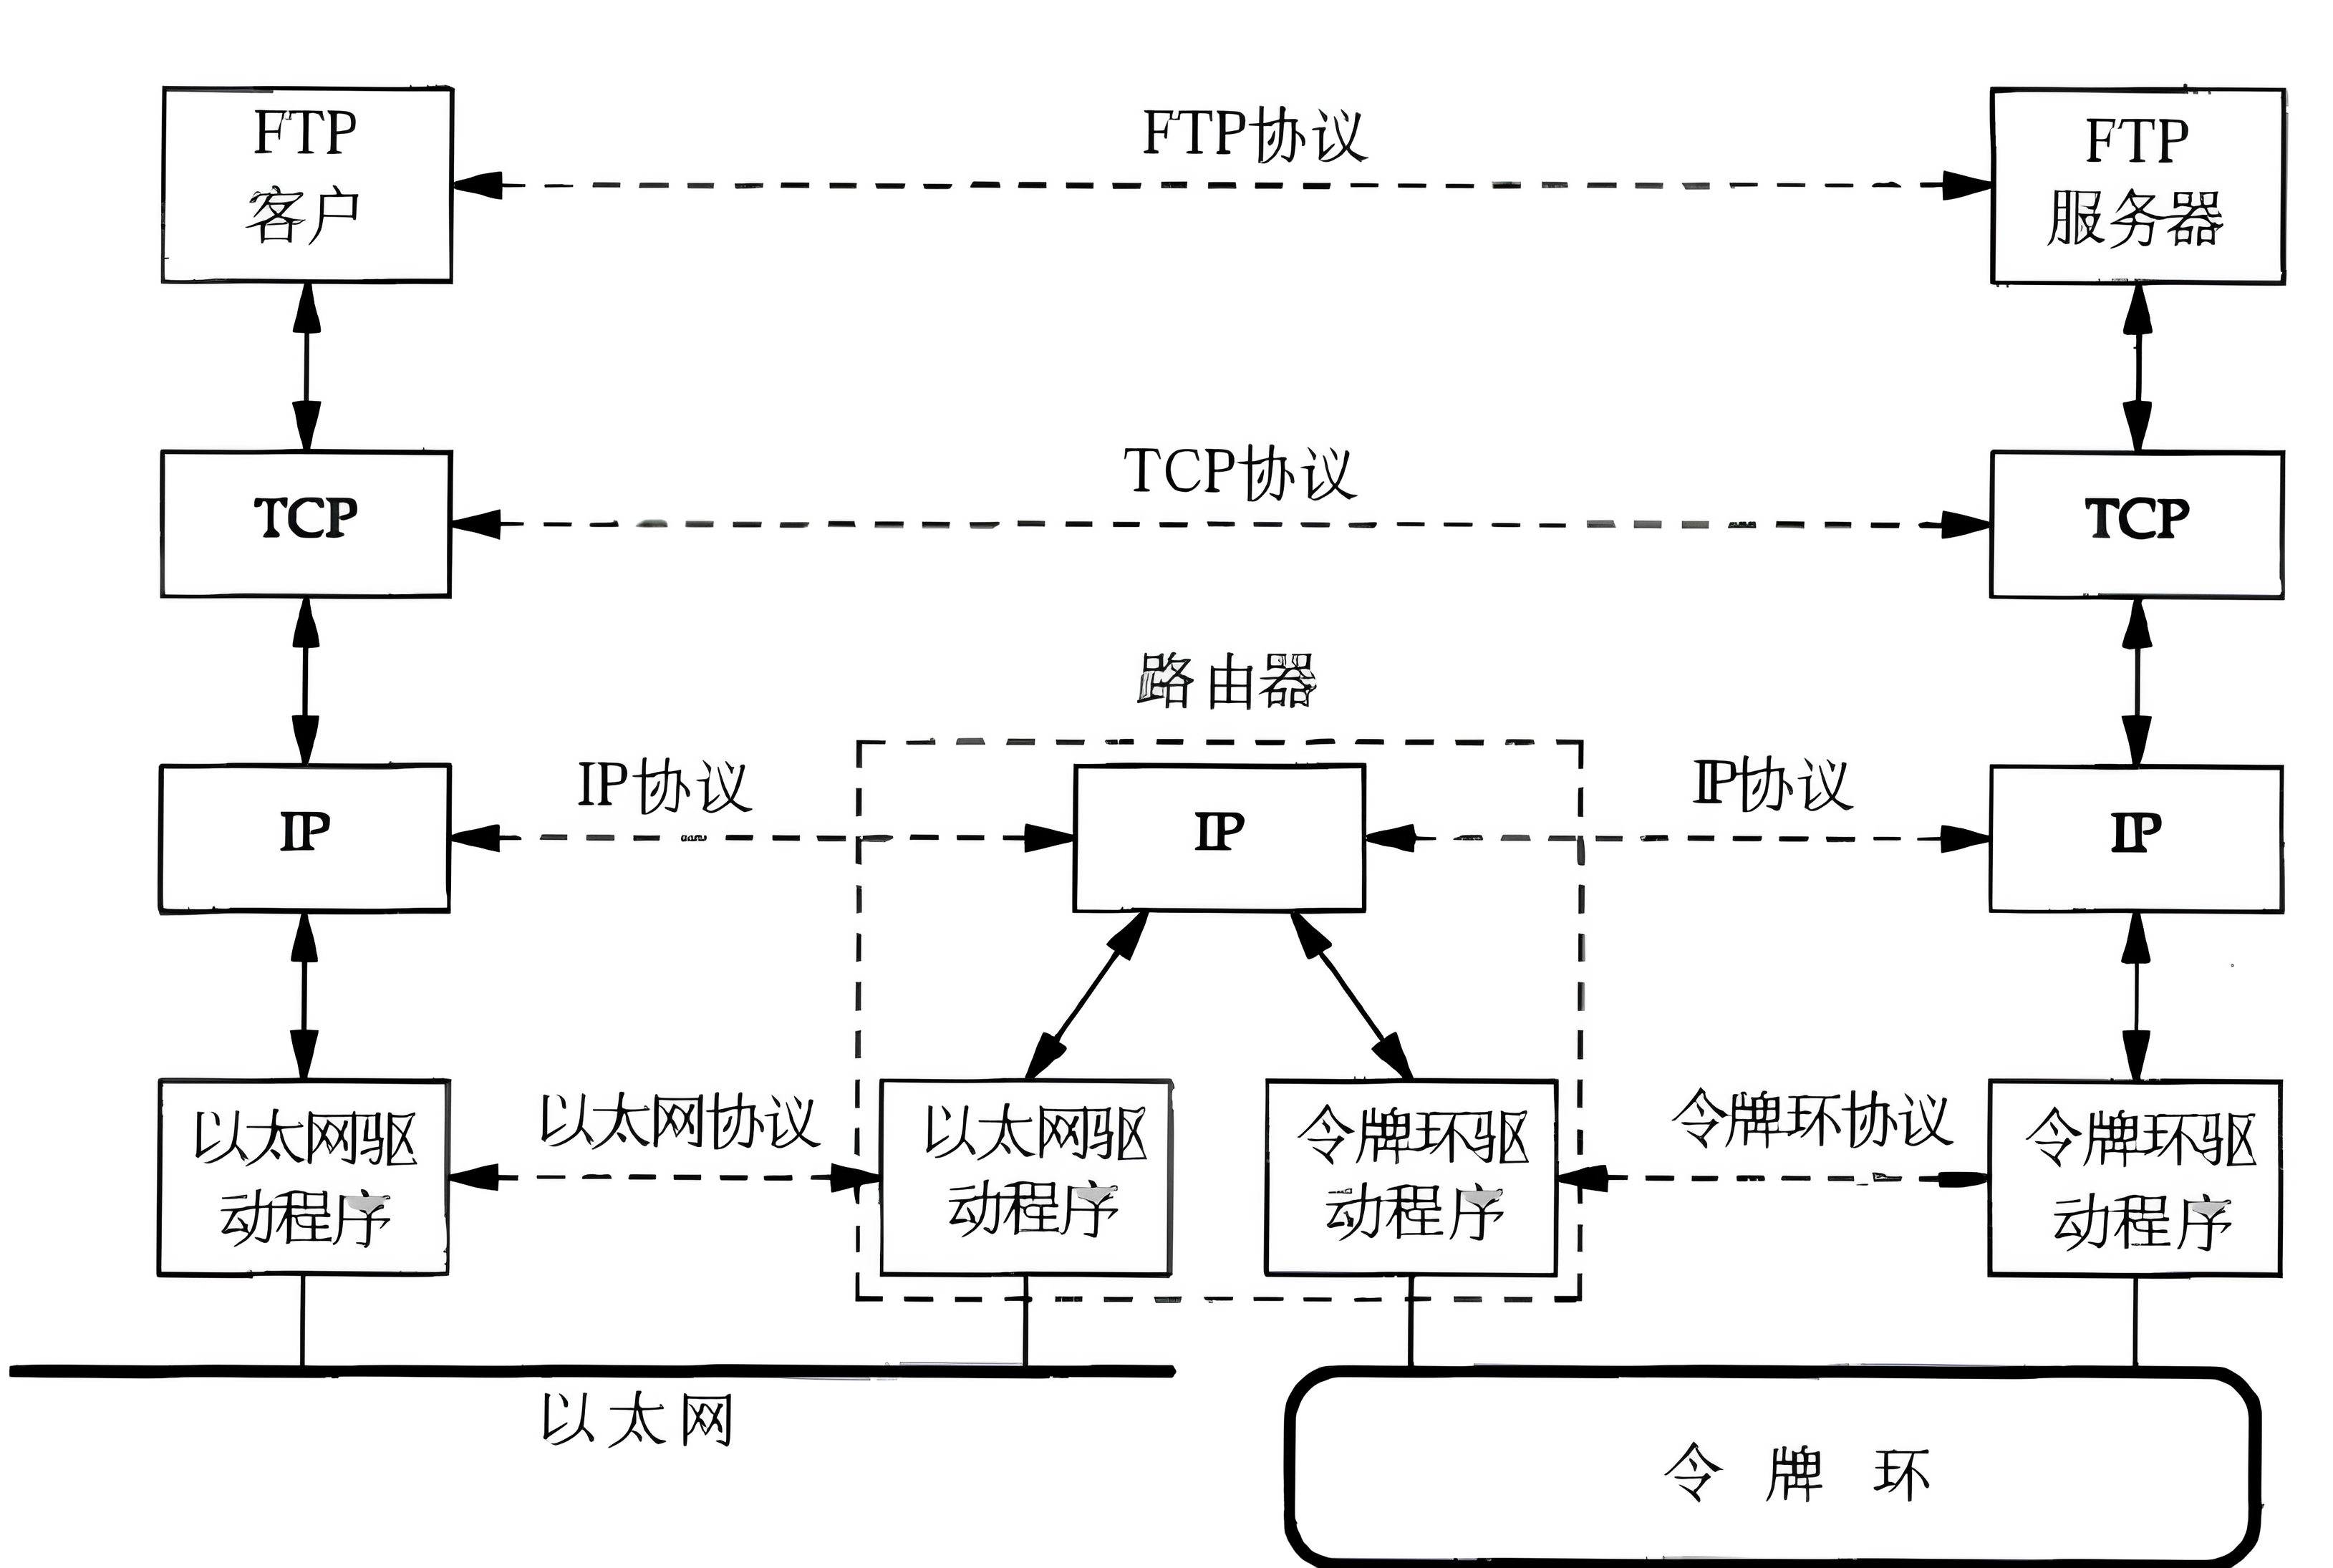
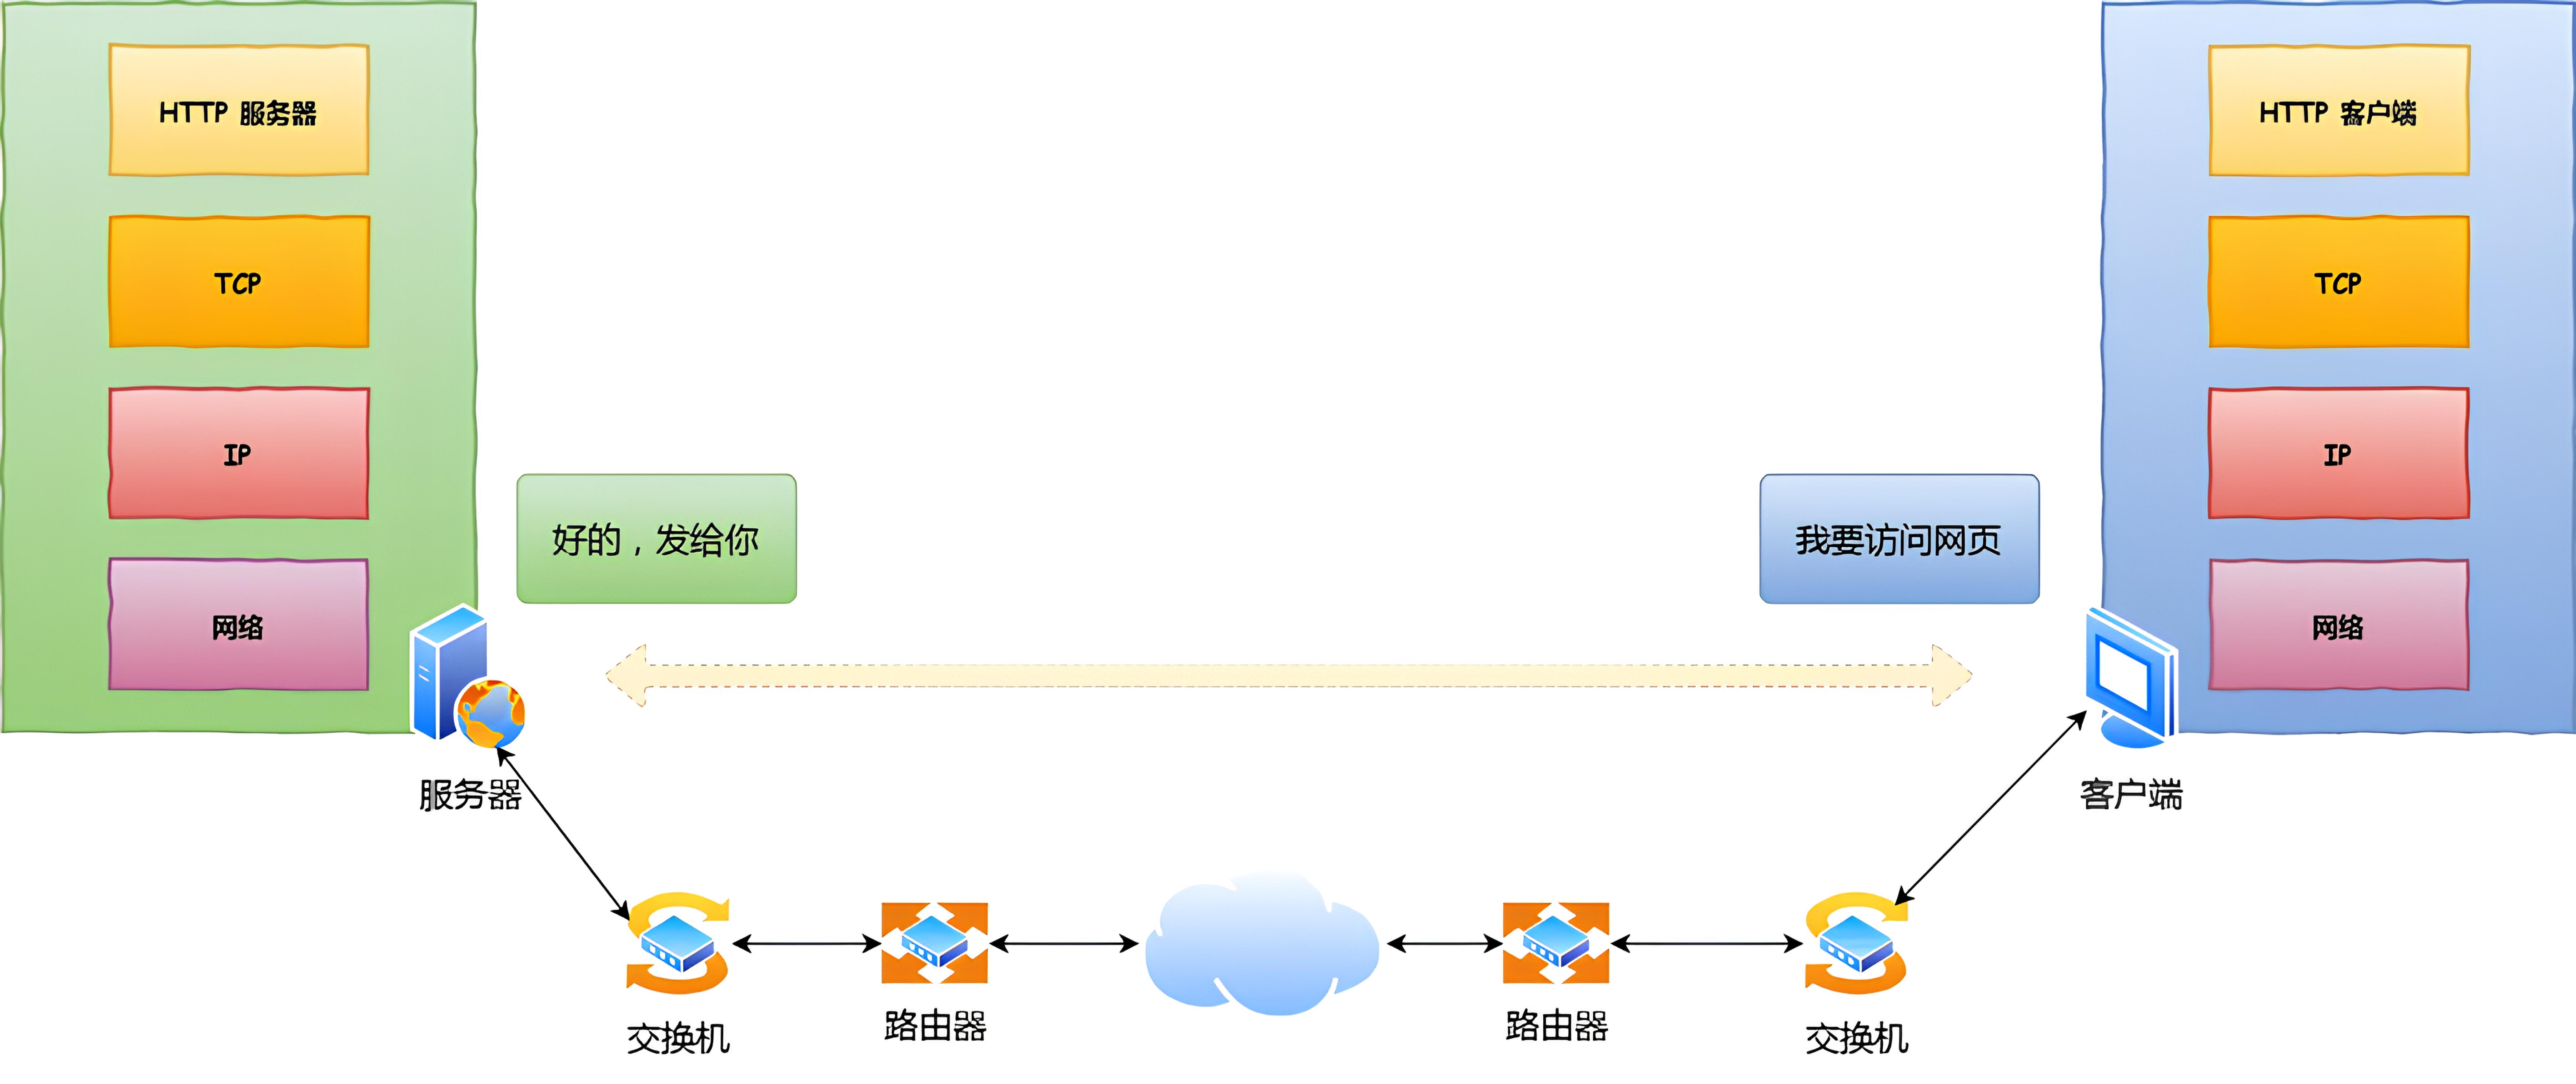
两台计算机之间的数据传输并不是直接从一台计算机的应用层直接到另一台计算机的应用层的,大致过程为:数据从一台计算机从应用层自顶向下到物理层,然后经过路由器、交换机等设备到达目标计算机的物理层,然后再从物理层到应用层,这样就完成了一次数据发送。所以一台计算机中是体现了TCP/IP5层协议的对应模型的。

我们平时获取一个信息,本质上就是用户通过网卡这样的外设,将数据请求,把远端发来的数据信息拉取到本地,本质就是用户在访问硬件。所以网络通信本质上也是在访问硬件。但是我们用户不能直接访问硬件,因为操作系统是硬件的管理者。所以对于用户来说,想要访问网卡,必须要贯穿操作系统,所以操作系统需要为我们提供系统调用。
更重要的是,不仅仅只有一个操作系统是这样子的。不同的操作系统内部实现由它们自己决定,但是不管是什么操作系统,往后实现网络部分的功能时,必须遵守上面的标准。要不然这个操作系统就没办法入网。所以不同的操作系统它的系统内部大部分都不一样,但是网络协议栈必须都是一样的。
网络传输的基本流程
IP地址和MAC地址
IP地址
IP地址(Internet Protocol Address)的全称叫作互联网协议地址,它的本义是为互联网上的每一个网络和每一台主机配置一个唯一的逻辑地址,用来与物理地址作区分。
IP地址协议有两个版本,IPv4和IPv6,我们整个的课程,一般提到IP协议,如果没有特殊说明的,默认都是指IPv4。IPv4的IP地址是一个4字节,32位的整数。而IPv6的IP地址是一个16字节,地址长度是128位的整数。我们通常使用 "点分十进制" 的字符串表示IP地址, 例如 192.168.0.1,用点分割的每一个数字表示一个字节,每一个字节的范围是 0 - 255;
MAC地址
MAC地址(Media Access Control Address)的全称叫做媒体访问控制地址,也称作局域网地址,以太网地址或者物理地址。MAC地址用于在网络中唯一标示一个网卡,一台设备若有一或多个网卡,则每个网卡都需要并会有一个唯一的MAC地址。MAC地址共48位(6个字节)。前24位由IEEE(电气和电子工程师协会)决定如何分配,后24位由实际生产该网络设备的厂商自行制定。如下是一个MAC地址样例 08:00:27:03:fb:19。
IP地址和MAC地址的区别
- 明显的区别就是长度不同。IP地址的长度为32位(IPv4)或128(IPv6)位,而MAC地址为48位。
- 只要在不重复IP地址的情况下,IP地址是可以随意更改的。而MAC地址一般是由生产厂商烧录好的,一般不能改动。当一台计算机的网卡坏了之后,更换了网卡则MAC地址也就会变了。
- 所处协议层不同。IP地址应用于网络协议栈的网络层,而MAC地址应用于网络协议栈的数据链路层。
- 最重要的区别在于,IP地址划分时是基于地理区域的,换了不同地方,即便是同一台硬件设备,IP地址一定不一样,可以理解为和地理位置有关。而MAC地址不依赖于地理区域,换了不同地方,只要还是同一台硬件设备,MAC地址就不会变,它只和硬件设备有关。
以太网通信
在一个局域网中,如果我们想和某一台主机进行通信,在该局域网中的所有主机都会接收到我们所发的报文,并且对该报文进行解包分用,发现当报头信息不是自己主机时,就会将数据摒弃,只有我们想要通信的那台主机得到数据,进而和我们进行通信。这种通信方式叫做“广播”,是以太网通信的方式。以太网是局域网通信中最常用的一种,除此之外还有令牌网等。
广播的大致过程为:在我们局域网进行实际通信的时候,当我们发送信息的时候,数据链路层的报头中一定要包含原 MAC地址和目标MAC地址,这个报文信息我们称为数据帧,整个局域网都会收到这个数据帧,每个主机会对该数据帧进行分离,如果发现报头中的目标Mac地址不是自己当前主机的Mac地址,就会直接丢弃,一旦丢弃了,上层就不会知道曾经收到过这个报文。而如果发现该数据帧的目标 Mac地址 是自己当前主机的地址时,就会将整个报文解析之后,继续交给上一层进行数据处理。
在一个局域网中,如果一台主机正在发消息,周围也有主机正在发消息,就有可能发送数据碰撞,一旦发生数据碰撞,所有人的消息也就全部都失效了。所以一旦发生数据碰撞,参与发送数据的主机,就要执行它所对应的碰撞避免的算法。
既然知道要发给谁,按如何获取对方的 MAC 地址呢?此时就需要 ARP 协议帮我们找到路由器的 MAC 地址。如果对方和自己处于同一个子网中,那么通过上面的操作就可以得到对方的 MAC 地址。然后,我们将这个 MAC 地址写入 MAC 头部,MAC 头部就完成了。
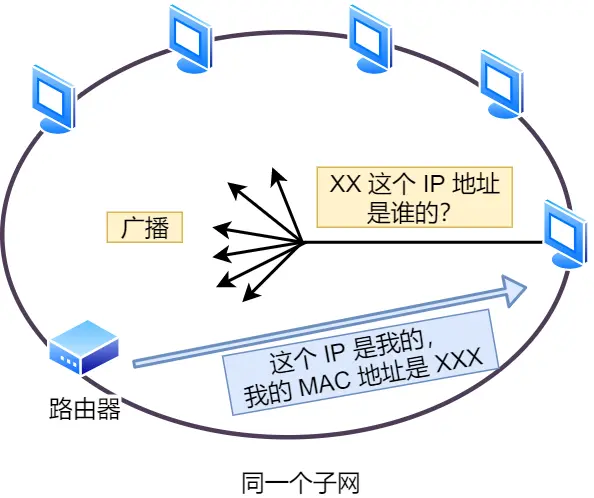
而在后续操作系统会把本次查询结果放到一块叫做 ARP 缓存的内存空间中,不过缓存的时间就几分钟。也就是说,在发包时会先查询 ARP 缓存,如果其中已经保存了对方的 MAC 地址,就不需要发送 ARP 查询,直接使用 ARP 缓存中的地址。而当 ARP 缓存中不存在对方 MAC 地址时,则发送 ARP 广播查询。
数据包的封装和分用
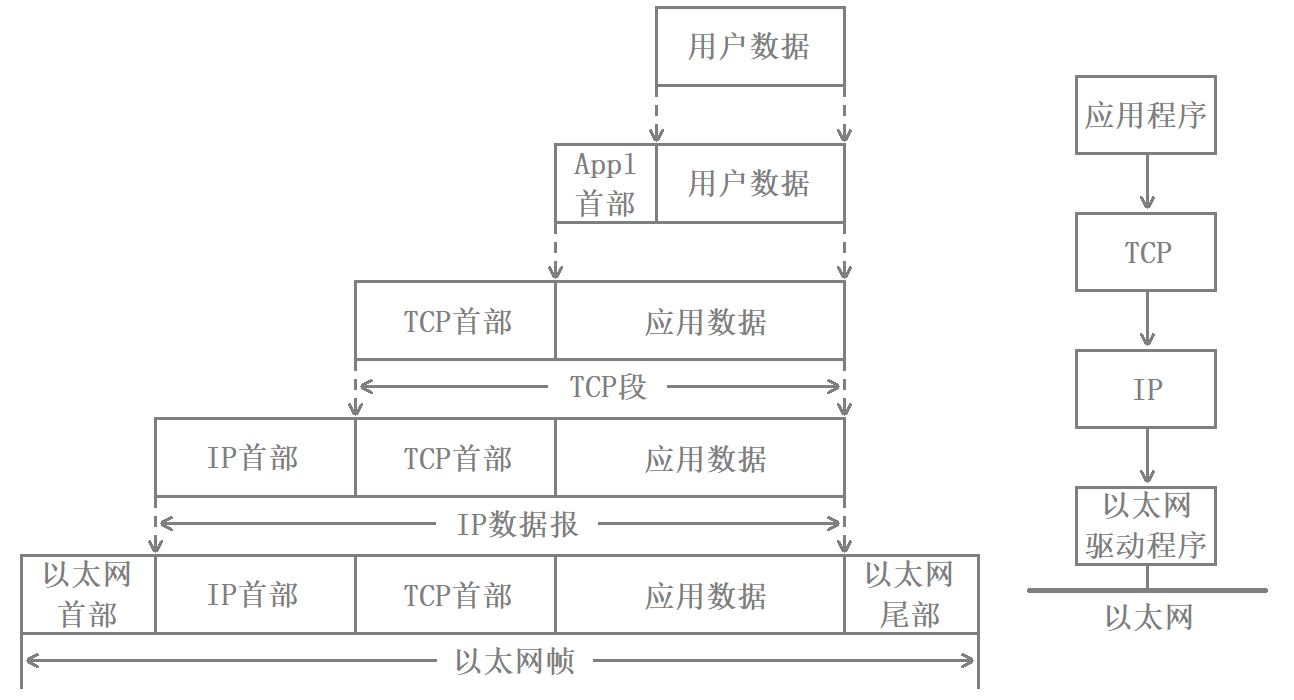
不同的协议层对数据包有不同的称谓,在传输层叫做段,在网络层叫做数据报,在链路层叫做帧。
应用层数据通过协议栈发到网络上时,每层协议都要加上一个数据首部(协议头),这个过程成文封装。首部信息中包含了一些类似于首部有多长、载荷有多长(载荷就是去除协议头的部分),上层协议是什么等信息。数据封装成帧后发到传输介质上,到达目的主机后每层协议再剥掉相应的协议头,根据首部中的 “上层协议字段” 将数据交给对应的上层协议处理。所以任何协议都必须具有添加协议头和分离协议头的能力,也就是封装与解包的能力。

跨网段传输
数据从一台计算机到另一台计算机传输过程中要经过一个或多个路由器。如果数据从A主机跨网络送到B主机,那么A主机和 B主机中间必须得有路由器这样的设备。
数据帧中有网络层协议头,其中就包含了当前设备的IP地址以及目标设备的IP地址。数据在跨网段传输的时候,需要经过路由器、交换机等设备对数据进行转发,而要经过路由器就必须要知道当前数据包要发往哪个路由器。所以数据帧中的链路层协议头中就需要包含当前设备的MAC地址以及目标路由器的MAC地址(这个工作是由交换机做的)。
当路由器收到了一条数据帧后,就会查询对应的转发信息库,找到找到“最适合”的路由条目后,将数据包根据路由条目所指示的出接口或下一跳转发出去。同时会修改数据帧中相关MAC地址的信息。
经过一系列的路由器以及交换机之后,数据最终会到达指定公网IP下的局域网中,最后再由局域网通信转发到目标设备上。最后目标设备将数据从网卡发送到网卡驱动,进而完成从链路层到应用层的数据解包。
在这期间,数据帧的目标MAC地址一直在变,而目标IP地址一直不变。而且IP协议屏蔽了底层网络(链路层和物理层)的差异化,通过路由器,将不同局域网的数据帧解包为相同格式的IP数据报。