东营市网站建设_网站建设公司_后端工程师_seo优化
前些天发现了一个巨牛的人工智能学习网站,通俗易懂,风趣幽默,忍不住分享一下给大家。点击跳转到教程。
Activiti工作流引擎使用
1.简单介工作流引擎与Activiti
对于工作流引擎的解释请参考百度百科:工作流引擎
1.1 我与工作流引擎
在第一家公司工作的时候主要任务就是开发OA系统,当然基本都是有工作流的支持,不过当时使用的工作流引擎是公司一些牛人开发的(据说是用一个开源的引擎修改的),名称叫CoreFlow;功能相对Activiti来说比较弱,但是能满足日常的使用,当然也有不少的问题所以后来我们只能修改引擎的代码打补丁。
现在是我工作的第二家公司,因为要开发ERP、OA等系统需要使用工作流,在项目调研阶段我先搜索资料选择使用哪个开源工作流引擎,最终确定了Activiti5并基于公司的架构做了一些DEMO。
1.2 Activiti与JBPM5?
对于Activiti、jBPM4、jBPM5我们应该如何选择,在InfoQ上有一篇文章写的很好,从大的层面比较各个引擎之间的差异,请参考文章:纵观jBPM:从jBPM3到jBPM5以及Activiti5
1.3 Activiti资料
-
官网:http://www.activiti.org/
-
下载:http://www.activiti.org/download.html
-
版本:Activiti的版本是从5开始的,因为Activiti是使用jBPM4的源码;版本发布:两个月发布一次。
-
Eclipse Plugin: http://activiti.org/designer/update/
-
Activit中文群:5435716
2.初次使用遇到问题收集
因为Activiti刚刚退出不久所以资料比较空缺,中文资料更是少的可怜,所以开始的时候一头雾水(虽然之前用过工作流,但是感觉差距很多),而且官方的手册还不是很全面;所以我把我在学习使用的过程遇到的一些疑问都罗列出来分享给大家;以下几点是我遇到和想到的,如果你还有什么疑问可以在评论中和我交流再补充。
2.1 部署流程图后中文乱码
乱码是一直缠绕着国人的问题,之前各个技术、工具出现乱码的问题写过很多文章,这里也不例外……,Activiti的乱码问题在流程图中。
流程图的乱码如下图所示:
解决办法有两种:
2.1.1 修改源代码方式
修改源码
org.activiti.engine.impl.bpmn.diagram.ProcessDiagramCanvas
在构造方法
public ProcessDiagramCanvas(int width, int height)
Font font = new Font("WenQuanYi Micro Hei", Font.BOLD, 11);当然如果你有配置文件读取工具那么可以设置在*.properties文件中,我就是这么做的:
Font font = new Font(PropertyFileUtil.get("activiti.diagram.canvas.font"), Font.BOLD, 11);2.1.2 使用压缩包方式部署
Activiti支持部署*.bpmn20.xml、bar、zip格式的流程定义。
使用Activit Deisigner工具设计流程图的时候会有三个类型的文件:
-
.activiti设计工具使用的文件
-
.bpmn20.xml设计工具自动根据.activiti文件生成的xml文件
-
.png流程图图片
解决办法就是把xml文件和图片文件同时部署,因为在单独部署xml文件的时候Activiti会自动生成一张流程图的图片文件,但是这样在使用的时候坐标和图片对应不起来……
所以把xml和图片同时部署的时候Activiti自动关联xml和图片,当需要获取图片的时候直接返回部署时压缩包里面的图片文件,而不是Activiti自动生成的图片文件
2.1.2.1 使用工具打包Bar文件
右键项目名称然后点击“Create deployment artifacts”,会在src目录中创建deployment文件夹,里面包含*.bar文件.
2.1.2.2 使用Ant脚本打包Zip文件
这也是我们采用的办法,你可以手动选择xml和png打包成zip格式的文件,也可以像我们一样采用ant target的方式打包这两个文件。
<?xml version="1.0" encoding="UTF-8"?>
<project name="foo"><property name="workflow.definition" value="foo-common-core/src/main/resources/diagrams" /><property name="workflow.deployments" value="foo-common-core/src/main/resources/deployments" /><target name="workflow.package.oa.leave"><echo>打包流程定义及流程图::OA-请假</echo><zip destfile="${workflow.deployments}/oa/leave.zip" basedir="${workflow.definition}/oa/leave" update="true"includes="*.xml,*.png" /></target>
</project>
这样当修改流程定义文件后只要运行ant命令就可以打包了:
ant workflow.package.oa.leave
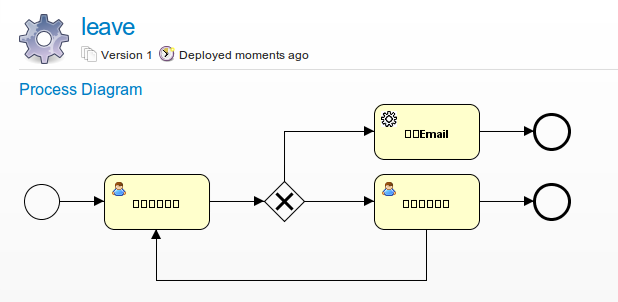
现在部署bar或者zip文件查看流程图图片就不是乱码了,而是你的压缩包里面的png文件。
2.2 使用引擎提供的Form还是自定义业务Form
2.2.1 引擎提供的Form
定义表单的方式在每个Task标签中定义extensionElements和activiti:formProperty即可,到达这个节点的时候可以通过API读取表单元素。
Activiti官方的例子使用的就是在流程定义中设置每一个节点显示什么样的表单哪些字段需要显示、哪些字段只读、哪些字段必填。
但是这种方式仅仅适用于比较简单的流程,对于稍微复杂或者页面需要业务逻辑的判断的情况就不适用了。
对于数据的保存都是在引擎的表中,不利于和其他表的关联、对整个系统的规划也不利!
2.2.2 自定义业务Form
这种方式应该是大家用的最多的了,因为一般的业务系统业务逻辑都会比较复杂,而且数据库中很多表都会有依赖关系,表单中有很多状态判断。
例如我们的系统适用jQuery UI作为UI,有很多javascript代码,页面的很多操作需要特殊处理(例如:多个选项的互斥、每个节点根据类型和操作人显示不同的按钮);基本每个公司都有一套自己的UI风格,要保持多个系统的操作习惯一致只能使用自定义表单才能满足。
2.3 业务和流程的关联方式
这个问题在群里面很多人都问过,这也是我刚刚开始迷惑的地方;
后来看了以下API发现RuntimeService有两个方法:
2.3.1 startProcessInstanceByKey
javadoc对其说明:
startProcessInstanceByKey(String processDefinitionKey, Map variabes) Starts a new process instance in the latest version of the process definition with the given key
其中businessKey就是业务ID,例如要申请请假,那么先填写登记信息,然后(保存+启动流程),因为请假是单独设计的数据表,所以保存后得到实体ID就可以把它传给processInstanceBusinessKey方法启动流程。当需要根据businessKey查询流程的时候就可以通过API查询:
runtimeService.createProcessInstanceQuery().processInstanceBusinessKey(processInstanceBusinessKey, processDefinitionKey);
建议数据库冗余设计:在业务表设计的时候添加一列:PROCESS_INSTANCE_ID varchar2(64),在流程启动之后把流程ID更新到业务表中,这样不管从业务还是流程都可以查询到对方!
特别说明: 此方法启动时自动选择最新版本的流程定义。
2.3.2 startProcessInstanceById
javadoc对其说明:
startProcessInstanceById(String processDefinitionId, String businessKey, Map variables) Starts a new process instance in the exactly specified version of the process definition with the given id.
processDefinitionId:这个参数的值可以通过repositoryService.createProcessDefinitionQuery()方法查询,对应数据库:ACT_RE_PROCDEF;每次部署一次流程定义就会添加一条数据,同名的版本号累加。
特别说明: 此可以指定不同版本的流程定义,让用户多一层选择。
2.3.3 如何选择
建议使用startProcessInstanceByKey,特殊情况需要使用以往的版本选择使用startProcessInstanceById。
2.4 同步用户数据
这个问题也是比较多的人询问过,Activiti支持对任务分配到:指定人、指定组、两者组合,而这些人和组的信息都保存在ACT_ID..表中,有自己的用户和组(角色)管理让很多人不知所措了;原因是因为每个系统都会存在一个权限管理模块(维护:用户、部门、角色、授权),不知道该怎么和Activiti同步。
2.4.1 建议处理方式
Activiti有一个IdentityService接口,通过这个接口可以操控Activiti的ACT_ID_*表的数据,一般的做法是用业务系统的权限管理模块维护用户数据,当进行CRUD操作的时候在原有业务逻辑后面添加同步到Activiti的代码;例如添加一个用户时同步Activiti User的代码片段:
/*** 保存用户信息 并且同步用户信息到activiti的identity.User,同时设置角色* @param user* @param roleIds*/
public void saveUser(User user, List<Long> roleIds, boolean synToActiviti) {accountManager.saveEntity(user);String userId = user.getId().toString();if (synToActiviti) {List<org.activiti.engine.identity.User> activitiUsers = identityService.createUserQuery().userId(userId).list();if (activitiUsers.size() == 1) {//更新信息org.activiti.engine.identity.User activitiUser = activitiUsers.get(0);activitiUser.setFirstName(user.getName());activitiUser.setLastName("");activitiUser.setPassword(user.getPassword());activitiUser.setEmail(user.getEmail());identityService.saveUser(activitiUser);// 删除用户的membershipList<Group> activitiGroups = identityService.createGroupQuery().groupMember(userId).list();for (Group group : activitiGroups) {identityService.deleteMembership(userId, group.getId());}// 添加membershipfor (Long roleId : roleIds) {Role role = roleManager.getEntity(roleId);identityService.createMembership(userId, role.getEnName());}} else {org.activiti.engine.identity.User newUser = identityService.newUser(userId);newUser.setFirstName(user.getName());newUser.setLastName("");newUser.setPassword(user.getPassword());newUser.setEmail(user.getEmail());identityService.saveUser(newUser);// 添加membershipfor (Long roleId : roleIds) {Role role = roleManager.getEntity(roleId);identityService.createMembership(userId, role.getEnName());}}}}
删除操作也和这个类似!
不管从业务系统维护用户还是从Activiti维护,肯定要确定一方,然后CRUD的时候同步到对方,如果需要同步多个子系统那么可以再调用WebService实现。
2.5 流程图设计工具用什么
Activiti提供了两个流程设计工具,但是面向对象不同。
-
Activiti Modeler,面向业务人员,使用开源的BPMN设计工具Signavio,使用BPMN描述业务流程图
-
Eclipse Designer,面向开发人员,Eclipse的插件,可以让开发人员定制每个节点的属性(ID、Name、Listener、Attr等)
2.5.1 我们的方式
可能你会惊讶,因为我们没有使用Activiti Modeler,我们认为用Viso已经能表达流程图的意思了,而且项目经理也是技术出身,和开发人员也容易沟通。
目前这个项目是第一个使用Activiti的,开始我们在需求调研阶段使用Viso设计流程图,利用泳道流程图设计和客户沟通,确定后由负责流程的开发人员用Eclipse Designer设计得到bpmn20.xml,最后部署。
2.6 Eclipse Designer存在的问题
这个插件有一个很讨厌的Bug一直未修复,安装了插件后Eclipse的复制和粘帖快捷键会被更换为(Ctrl+Insert、Shift+Insert);Bug描述请见:
-
Activit Forums中报告的Bug
-
Jira的登记
所以最后我们只能单独开一个安装了Eclipse Designer的Eclipse专门用来设计流程图,这样就不影响正常使用Eclipse JAVAEE了。
3.配置
3.1 集成Spring
对于和Spring的集成Activiti做的不错,简单配置一些Bean代理即可实现,但是有两个和事务相关的地方要提示:
-
配置processEngineConfiguration的时候属性transactionManager要使用和业务功能的同一个事务管理Bean,否则事务不同步。
-
对于实现了org.activiti.engine.delegate包中的接口的类需要被事务控制的实现类需要被Spring代理,并且添加事务的Annotation或者在xml中配置,例如:
/*** 创建缴费流程的时候自动创建实体** @author HenryYan*/
@Service
@Transactional
publicclass CreatePaymentProcessListener implementsExecutionListener {....
}
4.使用单元测试
单元测试均使用Spring的AbstractTransactionalJUnit4SpringContextTests作为SuperClass,并且在测试类添加:
@ContextConfiguration(locations = { "/applicationContext-test.xml"})
@RunWith(SpringJUnit4ClassRunner.class)
虽然Activiti也提供了测试的一些超类,但是感觉不好用,所以自己封装了一些方法。
代码请转移:https://gist.github.com/2182847
4.1 验证流程图设计是否正确
代码请转移:https://gist.github.com/2182869
4.2 业务对象和流程关联测试
代码请转移:https://gist.github.com/2182973
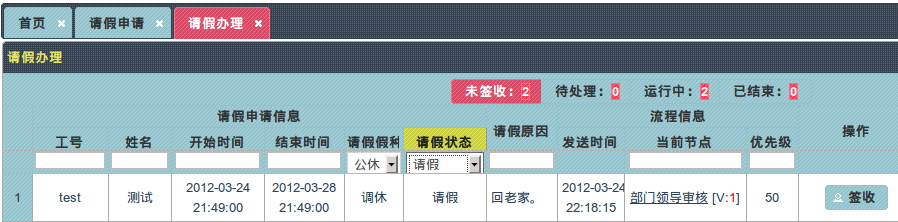
5.各种状态的任务查询以及和业务对象关联
我们目前分为4中状态:未签收、办理中、运行中、已完成。
查询到任务或者流程实例后要显示在页面,这个时候需要添加业务数据,最终结果就是业务和流程的并集,请参考6.2。
5.1 未签收(Task)
此类任务针对于把Task分配给一个角色时,例如部门领导,因为部门领导角色可以指定多个人所以需要先签收再办理,术语:抢占式
对应的API查询:
/*** 获取未签收的任务查询对象* @param userId    用户ID*/
@Transactional(readOnly = true)
publicTaskQuery createUnsignedTaskQuery(String userId) {TaskQuery taskCandidateUserQuery = taskService.createTaskQuery().processDefinitionKey(getProcessDefKey()).taskCandidateUser(userId);returntaskCandidateUserQuery;
}
5.2 办理中(Task)
此类任务数据类源有两种:
-
签收后的,5.1中签收后就应该为办理中状态
-
节点指定的是具体到一个人,而不是角色
对应的API查询:
/*** 获取正在处理的任务查询对象* @param userId    用户ID*/
@Transactional(readOnly = true)
publicTaskQuery createTodoTaskQuery(String userId) {TaskQuery taskAssigneeQuery = taskService.createTaskQuery().processDefinitionKey(getProcessDefKey()).taskAssignee(userId);returntaskAssigneeQuery;
}
5.3 运行中(ProcessInstance)
说白了就是没有结束的流程,所有参与过的人都应该可以看到这个实例,但是Activiti的API没有可以通过用户查询的方法,这个只能自己用hack的方式处理了,我目前还没有处理。
从表ACT_RU_EXECUTION中查询数据。
对应的API查询:
/*** 获取未经完成的流程实例查询对象* @param userId    用户ID*/
@Transactional(readOnly = true)
publicProcessInstanceQuery createUnFinishedProcessInstanceQuery(String userId) {ProcessInstanceQuery unfinishedQuery = runtimeService.createProcessInstanceQuery().processDefinitionKey(getProcessDefKey()).active();returnunfinishedQuery;
}
5.4 已完成(HistoricProcessInstance)
已经结束的流程实例。
从表ACT_HI_PROCINST中查询数据。
/*** 获取已经完成的流程实例查询对象* @param userId    用户ID*/
@Transactional(readOnly = true)
publicHistoricProcessInstanceQuery createFinishedProcessInstanceQuery(String userId) {HistoricProcessInstanceQuery finishedQuery = historyService.createHistoricProcessInstanceQuery().processDefinitionKey(getProcessDefKey()).finished();returnfinishedQuery;
}
5.5 查询时和业务关联
提示:之前在业务对象添加了PROCESS_INSTANCE_ID字段
思路:现在可以利用这个字段查询了,不管是Task还是ProcessInstance都可以得到流程实例ID,可以根据流程实例ID查询实体然后把流程对象设置到实体的一个属性中由Action或者Controller输出到前台。
代码请参考:https://gist.github.com/2183557
6.UI及截图
结合实际业务描述一个业务从开始到结束的过程,对于迷惑的同学看完豁然开朗了;这里使用请假作为例子。
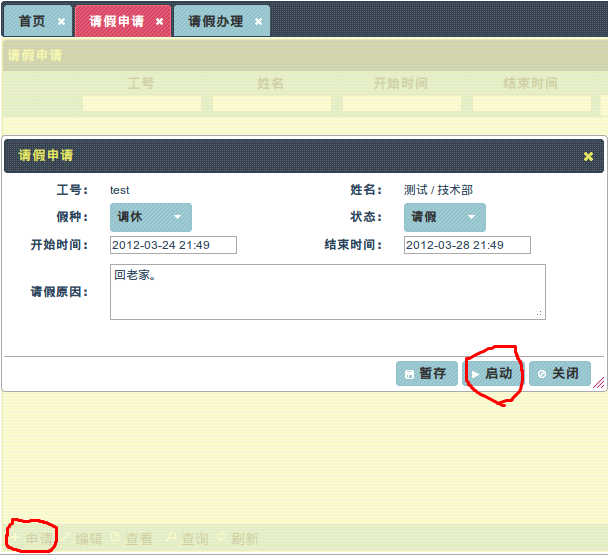
6.1 单独一个列表负责申请
这样的好处是申请和流程办理分离开处理,列表显示未启动流程的请假记录(数据库PROCESS_INSTANCE_ID为空)。
申请界面的截图:
6.2 流程状态
6.3 流程跟踪
图片方式显示当前节点:
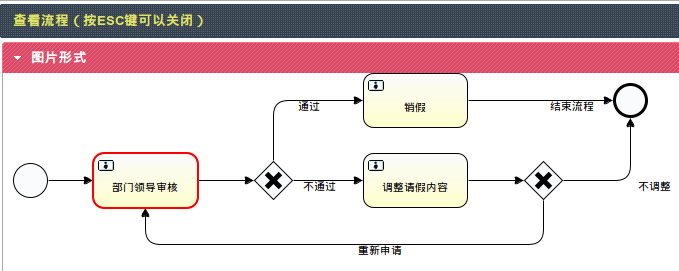
列表形式显示流程流转过程:

6.3.1 当前节点定位JS
Java代码请移步:https://gist.github.com/2183712
Javascript思路:先通过Ajax获取当前节点的坐标,在指定位置添加红色边框,然后加载图片。
代码移步:https://gist.github.com/2183804
7.开启Logger
- 添加log4j的jar
- 设置log4j.logger.java.sql=DEBUG
8.结束
之前就想写这篇文章,现在终于完成了,花费了几个小时,希望能节省你几天的时间。
请读者仔细阅读Activiti的用户手册和Javadoc。